Advanced Audio Editing Techniques in Reaper: Comping, Crossfades, Dynamic Split
- Noise Harmony

- May 22, 2024
- 3 min read
Updated: Jul 24, 2024
Reaper is well known for its flexibility and powerful editing capabilities. Whether you are a seasoned producer or an enthusiastic beginner, mastering advanced editing techniques can significantly enhance your workflow and the quality of your productions. In this blog post, we’ll dive into some of the more advanced editing features in Reaper, including comping, crossfades, and dynamic split.
1. Comping in Reaper
Comping is the process of combining multiple takes into a single, polished performance. This is especially useful for vocal recordings or any instrument where multiple takes are often necessary to capture the perfect performance.
Step-by-Step Guide to Comping:
Record Multiple Takes:
Set up a loop and record several takes of the same section. Each new take will be recorded in a new take within the same track.

Select the Best Sections:
Use the mouse to select the best take from each recorded section. You can also split items within one section [S] and easily switch between different takes within the split boundary [T].

Assemble the Comp:
Reaper will automatically play the selected take for the highlighted sections. You can continue to make selections across different takes to assemble the perfect comp. Use [Alt/Opt + Shift + T] to crop to active take. This way you will make sure that you will not select unwanted takes with an accidental misclick. Be careful! Do this only if you are happy with the chosen performances!

You can also choose to record in Lanes. This is a feature available in Reaper 7. By default, new takes are created, but you can change this by accessing the “Options” menu and selecting “Add lanes” from “New recording that overlaps existing media items”.

Now each overlapping recording will be saved in a new lane. To start comping recorded lanes, right-click the lane track and select “Comping” -> “Comp into new empty lane”.

Highlight the takes that you like with your cursor to select them into the comping lane. You can finish editing by double clicking the lane circle on the left. This way you will block accidental changes to selected takes.

2. Crossfades in Reaper
Crossfades ensure smooth transitions between audio clips, preventing clicks and pops that can occur when clips are cut abruptly.
Creating Crossfades:
Automatic Crossfades:
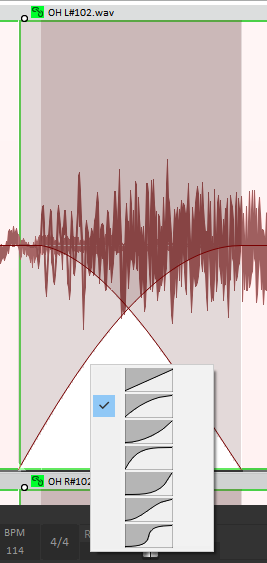
Enable automatic crossfades by clicking the “Auto Crossfade” button on the main toolbar [Alt/Opt + X]. Now, whenever you overlap two items, Reaper will automatically create a crossfade. You can also right-click the crossfade curve to change its shape and drag it with the cursor to reposition it.


Crossfades Adjustment:
To adjust the crossfade, select two overlapping clips and then choose the “Crossfade Editor” from the “Edit” menu. This way you will access more advanced crossfade options. You can also access these options by double-clicking the crossfade curve.

3. Using the Razor Edit Tool
Razor Editing is a versatile tool in Reaper that allows for quick cutting, copying, and pasting sections of your project with incredible precision.
How to Use Razor Edit:
Activate Razor Edit:
Select the Razor Edit tool from the toolbar

Select Regions:
Click and drag to create a selection around the area you want to edit. You can select across multiple tracks simultaneously.

Perform Edits:
Once you have a selection, you can move (drag it), copy (drag it while holding Ctrl/Cmd), or delete (Delete) the selected area. You can also stretch the selection into the chosen direction by dragging the edge of selection with the cursor.
4. Dynamic Split
Dynamic Split is a powerful tool that allows you to automatically split audio items based on their transients, making it easier to edit complex recordings. It works best on transient oriented media items, like drums
How to Use Dynamic Split:
Open Dynamic Split:
Select an audio item, right-click, and choose “Item Processing” > “Dynamic Split Items…” [D]

Configure Settings:
In the Dynamic Split dialog, you can adjust the sensitivity to detect transients, set thresholds for splitting based on volume, and fine-tune the settings to match the characteristics of your audio.

Split and Edit:
Once configured, apply the split. Reaper will automatically create new items at each detected transient or volume change, allowing you to easily edit or rearrange the segments. You can also choose to generate stretch markers instead of splitting items.

Conclusion
Mastering these advanced editing techniques in Reaper can elevate your music production skills, allowing you to create seamless, professional-quality tracks. These tools will streamline your workflow and enhance your creative process. Don’t be afraid to experiment with the editing tools available in Reaper. Happy editing!


Comments